


 New Code Sent!

Info Hub: Owners
How to do Laundry: The Only Guide Needed
Whether for work or for fun or to just comfortably relax at home, you rely on laundry to make sure you have clean clothes every day. Some people may need to do laundry once or twice a week and others may find themselves doing it daily. Either way, the more you understand about doing your laundry, the more efficient the process can be and you can also enjoy better results.
Whether you've just started doing laundry or are already a subject matter expert, this guide from Maytag can help you figure out how to do laundry so that it’s less of a chore. We’ll cover the many aspects of laundry, from how to wash loads to proper cycle selection and more. This eight-step guide on how to wash and dry clothes can help you master laundry day.
Step 1: Review and Understand Your Laundry Symbols
You may have noticed a lot of different symbols associated with clothing and laundry. The question is, what do they all mean?
To start, check your clothing label as this is where your fabric information followed by a series of symbols is located. Make sure to distinguish between the symbols for washing and the symbols for drying.
Next, dedicate some time to understanding how the different fabric types respond to different water temperatures, detergents, and agitation. The most common laundry care symbols provide important information that guide you on washing, heat level, bleach usage, dry cycles, ironing and dry cleaning.
Learn more here about decoding laundry care symbols.

If your whites are looking a little dull, refer to the triangle on the clothes’ label (if there is one) as this will provide bleaching instructions.
Most laundry machines are built with technologies that have rendered ironing unnecessary. If a particular piece of clothing does require ironing, or you simply want ironed clothing, symbols shaped like a traditional iron will guide you on how to do it.
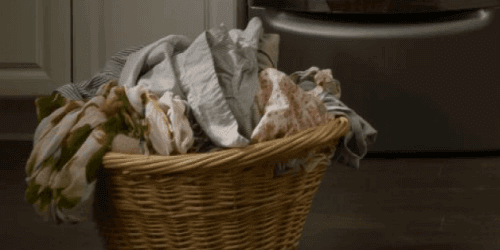
Step 2: Prepare your Clothes to be Washed
Before washing your clothes, you need to prepare your load to make sure you get the results you want.
Start by double checking every label and set aside any articles of clothing that should only be hand washed or dry cleaned.
Once your load is sorted, go about emptying pockets, closing zippers, fastening hooks and tying all loose strings. Then, turn clothing that is prone to odour retention and/or fading, like jeans and workout clothes, inside out. Make sure to turn your sweaters inside out to help avoid piling.
Always try to pretreat stains or soiled areas. Certain top load washers are equipped with a water station where you can soak and pretreat garments with water or water and detergent in an effort to treat stains prior to being washed. Select Maytag® top load washers have a built-in water faucet. This lets you rinse off loose soils before clothing enters the washer. Another option is to fill the tub for a pre-cycle soak. Learn more about Maytag top load washer features here.

Turn your gym clothes inside out before washing. This will help soapy water reach the inside surface where sweat and odour get trapped.
New clothes should be washed on their own for their first few cycles. The reason for this is that new clothes tend to bleed dye more readily, and you want to avoid that new blouse ruining the rest of your load!
Here are some general stain removal rules:
- Immediately treat stains. Fresh stains are easier to remove than ones that have set in. If the stain is on a non-washable fabric, you should take it to the dry cleaners as soon as you can. Make sure that you tell them about the stain and the fiber content of the garment.
- Read and follow package directions when using any stain removal product.
- Test stain removers on an inside seam or other hidden part of the garment for colour fastness. Conduct a test by applying the product and then letting it stand for 2-5 minutes, and then rinsing it. If the colour changes at all, avoid using this stain remover on that particular garment.
- When cleaning a stain, place the stained area face down on either a clean and dry paper towel or white cloth. Apply stain remover to the underside of the stain. This will force the stain off the fabric surface, instead of through it.
- When using bleach, be sure to use it on the entire garment, not just one area. Always follow the manufacturer’s product use instructions. Also review and follow the care instructions and the warnings on the garment care label that pertain to the use of bleach.
- Never put chemical dry cleaning solvents directly into a washing machine
- Carefully and thoroughly rinsing and air-drying the area(s) of a garment that were treated with dry cleaning solvents before placing in the washer. This can prevent a fire from occurring.
- Never mix stain removal products as certain mixtures, like ammonia and chlorine bleach, can be dangerous and produce noxious fumes.
Get more information about how to remove stains with the Maytag step-by-step stain removal guide. This guide can help you tackle tough stains like those from red wine to blood. Follow your appliance and product use and care instructions prior to starting. This is your primary source of information.
Step 3: Sort and Separate Laundry
Sort by colour first and then by fabric type and soil level until you’ve separated everything into loads of similar clothes. Check your items’ tags for any specific needs or instructions that may affect sorting.
COLOUR: separate whites, lights and darks to avoid running the risk of dyes bleeding out and staining other articles of clothing.
FABRIC TYPE: Washing delicate and more durable fabrics (denim, cotton, synthetics, blends, delicates, towels and bedding) separately may prevent damage. This is because heavier fabrics can be more abrasive, which can cause additional wear and tear on delicate clothes, resulting in tearing or other damage. It can also ensure more even drying, if they are moved as one load to the dryer.
SOIL LEVEL: Separate heavily soiled items from lightly soiled items. Often, more soiled items should be washed in a longer, heavy-duty cycle.
Separate lint-givers from lint-takers. By washing lint-giving fabrics like towels and rugs separately from lint-takers like synthetics, knits and corduroy, you can keep lint off clothes.
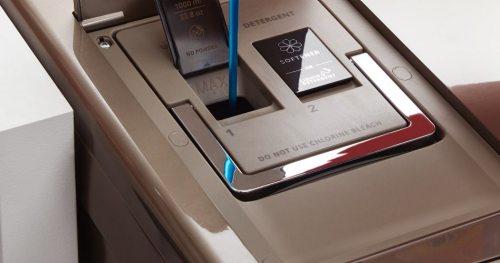
Step 4: Add Detergent
Add detergent but you don’t want to just thoughtlessly pour it into the machine.
If your washer requires high-efficiency (HE) detergent, then you should only use HE detergent. Learn more about HE detergent with this quick guide.
Pour detergent into the dispenser or directly into the tub, depending on your washer. Follow the package instructions to ensure you measure the right amount of detergent, which will depend on the load size and the detergent concentration. If using a detergent pod, place it in the bottom of the tub.

Swash™ liquid laundry detergent from Whirlpool Corporation works equally well in both HE and non-HE washers. It is 8x concentrated, so you can use less than regular detergent. Also, the compact and intelligent bottle design has a precision pour cap to prevent the waste caused by over pouring. Learn More here.

Some washers have an automatic detergent dispenser to help you save time and deliver desirable results. This feature calculates how much detergent is needed for every load. Select front load Maytag(R) washing machines have an Optimal Dose Dispenser that adds the right amount of detergent when needed, holding enough for up to 8 loads of laundry (Based on an 8-lb load).
You may want to consider adding fabric softener to your laundry routine. Fabric softeners smooth and coat fibers helping to make them feel softer in addition to fighting wrinkles, reducing static and, in some cases, adding a fresh fragrance to your clothes. For liquid softener, carefully measure the right amount for your load, as indicated on the fabric softener packaging. Add liquid fabric softener into the designated softener dispenser prior to washing, if this feature is available. Always check the care label of each clothing item before use.
You can typically find more specific information in your owner’s manual. If your washer doesn’t have a dispenser, manually add liquid fabric softener during the final rinse cycle once the tub is filled with water. Do not add during the wash cycle. This will rinse away the effects of the softener.
Want to learn more about fabric softener? Click here.
Step 5: Load the Washer
Load items into the washer loosely around the tub in an even manner so that items can move around in the water and tumble.

If you’re washing bulky single items like a rug or jacket, add some extra items around the tub to balance the weight.
Step 6: Select the Wash Settings
Certain washing machine models offer a variety of cycles. The Normal cycle is your go-to for your typical loads. You may have to deal with different stains and fabric types so consider other cycle options to achieve the most optimal clean.
Always double check the use and care instructions on your appliance and clothing labels before washing.
Select the cycle, temperature, spin speed and extras:
Select a cycle that fits the meets of your specific load. You may select a different wash temperature based on the soil level and the type of fabric you are planning to wash. If you don’t know which cycle to use, see this Laundry Cycle Guide to find out.
Typical cycle options may include:
Cold water wash: A common choice to wash bright or darkly coloured cotton, linens, casual items, mixed loads or clothes with cold water stains.
Delicate cycle: A common cycle often employed to wash lightly soiled sheer fabrics, lingerie, sweaters, blouses, pants or anything where a “gentle” cycle is recommended. It usually combines gentle wash action with low-speed spin for gentle cleaning, and often reduces wrinkling.
Wrinkle Control/Permanent Press Cycle: Often used for items with this specific symbol on its care tag such as fabrics that wrinkle easily like button-up shirts, professional attire, linens, activewear or non-iron clothing. It uses warm water and slower spin cycles to release wrinkles while working to prevent new ones from setting.
The next step is to select add-ons like steam or a longer soak to help with loads needing extra cleaning .
Cycle options on select Maytag® washing machines:
- On select Maytag® front load washers, add the Fresh Hold® option to intermittently tumble the load after a cycle ends. This will help clean clothes continue to smell fresh for up to 16 or 24 hours.
- On select Maytag washing machines, you can choose the Extra Power button on any wash cycle to help boost stain-fighting performance with a dual-temperature wash.

Step 7: Get Ready to Dry
Transfer clothes from the washer to the dryer as soon as possible. This may help lessen wrinkles and may prevent odours from building up.
Be sure to do the following:
- As you load, set aside stained items and/or anything that recommends air drying on the tag.
- Fill the dryer about halfway for permanent press loads and three-quarters of the way for normal loads. Tightly balled up clothes or an overflowing drum leads to slower dry times and wrinkled items.
- Frequently clean the dryer’s lint screen by rolling lint off with your fingers. This will help maintain good air circulation for fast dry times. Never use water to remove lint.

Step 8: Select the Dryer Settings
Most dryers offer several features and cycle options that can increase efficiency and optimize performance. It’s best to consult your items’ care tags and make sure that you understand what each symbol means by consulting this quick guide.

Some typical cycle options include:
Regular/Automatic: typically a high heat setting that is best for items like cotton and those that take longer to dry like sweatshirts, jeans, among others
Delicate/Gentle: typically a lower heat setting best suited for loosely woven fabrics or anything with embellishment like beading, sequins and iron-on decals. Remember to dry spandex/exercise clothing on low heat because it prevents the fabric from fraying, fading and stretching.
Permanent Press: typically a medium heat setting that works well for clothes that are made of synthetic fibers or specially treated to guard against wrinkles. It may also employ a cool down period near the end of the cycle, switching from warm air to room temperature air, to keep clothes from wrinkling or creasing.
To further help wrinkle prevention, certain dryer models will periodically tumble the load at the end of the cycle (often with no heat added). The occasional tumbling can continue for 30 to 90 minutes, depending on the dryer model.
Some dryer models may also offer a Steam Cycle that combines water and heat to help release wrinkles without rewashing. In some cases, it can also help eliminate odours and lighter stains.
Many modern dryers have auto-sensing technology. Instead of ending the cycle once the set time has expired, the dryer utilizes a moisture sensor that senses when items are almost completely dry and stops the cycle then. Advanced Moisture Sensing by Maytag® measures temperature and moisture levels to help evenly dry loads so you can achieve an optimal dry:
- A sensor monitors incoming air temperature.
- Sensing strips in the dryer drum detect moisture levels in clothes.
- Another sensor measures outgoing air temperature.
- When air reaches the right temperature and clothes are as dry as needed, the cycle stops.
Maytag® dryers with the Extra Power button combine the benefits of auto-sensing with the ability to activate an additional ten minutes of drying action.
- Extends time heat and tumbling on auto-sensing and timed dry cycles
- Helps prevent underdrying of thick fabrics, pockets, hems and seams
Explore the benefits of Extra Power
Learn more about all the features and benefits that Maytag dryers offer.
The “tumble dry” symbols mean that you can dry the garment in your dryer instead of air drying it.
Step 9: Find Space to Neatly Fold

The last step is to allocate a clean and flat surface for folding. This can help clothes stay clean by keeping them off the floor or the tops of your washer and dryer.
One helpful option are hamper doors, available on select Maytag® top load dryers. They offer a convenient place to get your clothes ready to be put away. Simply drop down the latch-free door and use it as a sturdy platform for unloading, folding and stacking.
Now you have the tools to tackle laundry day! Use this guide to navigate the ins and outs of doing laundry to make sure your clothes and linens are cleaned and dried as needed and to avoid one little misstep ruining your load.
Want to learn more about laundry from Maytag? Maytag® washers and dryers enhance the look and performance of any laundry space. Learn more here.
Browse our full lineup of washers and dryers to find the right high-efficiency machines so you can power through tough loads.
Related Articles
-
 How to Remove Stains from Clothes Learn the how to remove stains from various fabrics with this step-by-step guide. This guide will help you remove ink, blood, and other common stains.
 -
 HE Detergent: What Is It & Do You Need It? Why do you need HE detergent? Can you use HE detergent in a regular washer? Learn more about what makes HE detergent special and more from Maytag.
 -
 Decoding Laundry Symbols Get clarity on clothing care symbols. Learn how to read wash care symbols so you can properly care for your clothes. Our washing symbols guide can help.
